Can You Use a Pedal Bike as a Balance Bike?
Bottom line: You can remove the pedals from a children's bike and use it for balance practice, but it is rarely the ideal solution. Standard pedal bikes are usually heavier, taller and not designed for scooting or gliding comfortably.
Some parents consider removing the pedals from an existing kids bike to help their child learn balance first. While this approach can work temporarily, the frame geometry, saddle height and overall weight often make the learning process harder than it needs to be.
Bikes designed specifically for balance-first learning allow children to develop coordination and confidence before introducing pedals. This approach often leads to a smoother transition to independent riding.
If you're researching balance bikes for your child, our Balance Bike Guide for Parents explains how balance bikes work, how to choose the right size and when children are ready to progress to pedals.

Using a Pedal Bike for Balance Practice
Removing the pedals allows a child to push along with their feet and focus on balance and steering. However, most standard bikes are not designed for this setup.
Key Considerations
- Bike size: Many pedal bikes are heavier and larger than necessary for early balance development.
- Saddle height: Seats often do not go low enough for smaller children to place both feet flat on the ground.
- Weight distribution: Standard frames are not optimised for gliding and scooting.
How to Convert a Standard Pedal Bike
-
Remove the pedals using a pedal spanner:
- Right pedal - counter-clockwise
- Left pedal - clockwise
- Lower the seat so your child can sit with both feet flat on the ground.
- Check clearance - many standard bikes remain too tall, even at their lowest setting.
Advantages
- Cost-effective if you already own the bike.
- Pedals can be reattached later.
Limitations
- Heavier and harder to control for young children.
- Frame geometry not designed for balance training.
- Children often outgrow the setup quickly.
Why Purpose-Built Designs Work Better
Bikes designed specifically for early balance development are lighter, lower and easier to control. Some models are engineered to convert between balance mode and pedal mode as children progress, allowing them to stay on the same familiar frame.

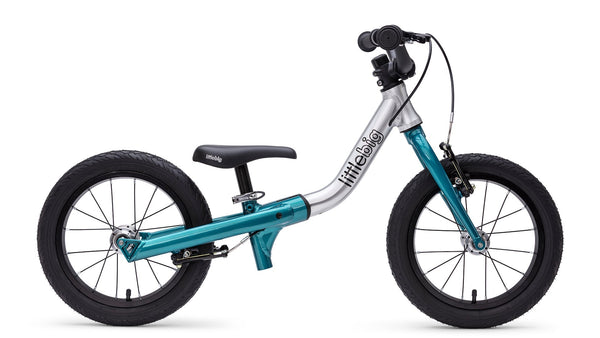
Example: Convertible Design
A convertible model begins as a lightweight balance setup and later adapts for pedalling without requiring a completely new bike. This can provide a smoother transition while maintaining proper geometry throughout.

When Should You Introduce Pedals?
Most children are ready to pedal once they can glide confidently with their feet up, steer smoothly, and stop safely. If you want a simple checklist, read our guide on how to tell when your child is ready to start pedalling.
Conclusion
While it is possible to remove pedals from a standard bike, the result is rarely as effective as a purpose-built or convertible design. The right setup makes learning balance simpler, safer and more enjoyable.
If you are researching long-term options, you can see how the LittleBig Convertible Balance Bike works in both balance and pedal modes.